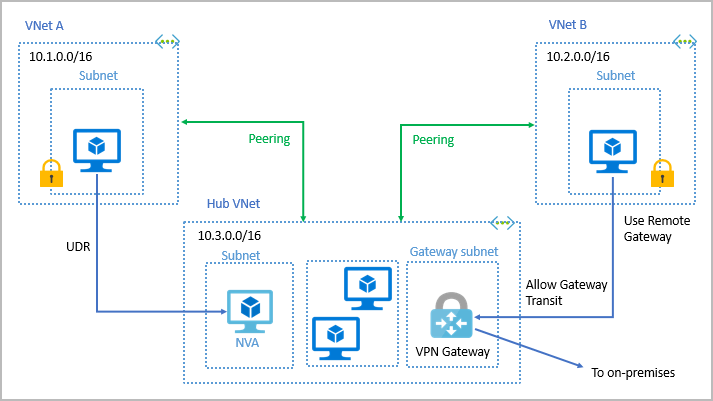
Azure Virtual Network (VNet) is a fundamental building block of your Azure environment. It allows you to securely connect Azure resources, such as virtual machines and databases, and enables seamless communication with on-premises networks. Whether you’re new to Azure or looking to refine your configuration, this guide will walk you through the process of setting up a Virtual Network effectively.

What is Azure Virtual Network (VNet)?
Azure Virtual Network is a private network in the cloud. It provides:
- Isolation: Keeps your resources securely isolated from others.
- Connectivity: Connects Azure resources and extends your on-premises network.
- Scalability: Adapts to your changing workload needs.
Steps to Configure Azure Virtual Network
Step 1: Log into the Azure Portal
- Visit the Azure Portal and sign in with your credentials.
Step 2: Create a Virtual Network
- In the Azure Portal, navigate to Create a Resource > Networking > Virtual Network.
- Provide the following details:
- Name: Choose a descriptive name for your VNet (e.g., MyVNet).
- Region: Select the Azure region closest to your resources.
- Address Space: Define an IP range using CIDR notation (e.g., 10.0.0.0/16).
Step 3: Configure Subnets
- In the Subnets tab, click on Add Subnet.
- Provide a name (e.g., WebSubnet) and an IP range (e.g., 10.0.1.0/24).
- Add additional subnets for different purposes, such as databases or application tiers.
Step 4: Enable Security Features
- Network Security Groups (NSGs):
- Attach an NSG to subnets or individual resources to control inbound and outbound traffic.
- DDoS Protection: Enable Azure DDoS Protection to safeguard against attacks.
Step 5: Connect Resources
- Assign the VNet to Azure resources like Virtual Machines (VMs) during their creation.
Step 6: Set Up Virtual Network Peering (Optional)
- If you have multiple VNets, set up peering to allow communication between them.
Step 7: Integrate On-Premises Network (Optional)
- Use a VPN Gateway or Azure ExpressRoute for hybrid connectivity with your on-premises network.
Best Practices for Configuring Azure Virtual Network
- Use a Clear Addressing Scheme: Avoid overlapping IP ranges for easier management.
- Implement Subnet Isolation: Separate subnets for web, app, and database tiers to enhance security.
- Regularly Monitor Traffic: Use Azure Monitor and Network Watcher to analyze and troubleshoot connectivity issues.
Why Configure an Azure VNet?
- Security: Isolate and secure resources.
- Connectivity: Seamlessly integrate on-premises and cloud environments.
- Cost Optimization: Reduce data transfer costs by keeping traffic within the VNet.
FAQs
1. What is the maximum number of VNets I can create in Azure?
Azure allows up to 1000 VNets per subscription, depending on the region and subscription type.
2. Can I change the address space of a VNet after creation?
Yes, Azure supports modifying the address space, but it must not overlap with existing subnets.
3. How do I secure my VNet traffic?
Use NSGs, Azure Firewall, and DDoS protection to secure inbound and outbound traffic.
Conclusion
Configuring an Azure Virtual Network is a crucial step for building a secure and scalable cloud environment. By following this guide, you can set up a robust network to meet your organization’s needs while ensuring optimal performance and security.
Ready to get started? Log in to the Azure Portal and begin configuring your Virtual Network today!


